Ch5. Modeling Visualization
이번 챕터는 각 분석 별로 파생되어 나오는 그래프들에 대해 소개해드리도록 하겠습니다. 시각화 방법만 다루고 있으므로 모형에 대한 해석은 진행하지 않습니다. (애초에 난수 데이터여서 데이터가 정확하지도, 결과값이 깔끔하게 나오지도 않습니다.)
1. Survival Plot
생존분석을 진행한 후, ggsurvplot()을 이용하여 그래프를 그리도록 하겠습니다.
xxxxxxxxxxlibrary(survival)library(survminer)fit<- survfit(Surv(Survival_Time, EVENT) ~ Treatment ,data = SAMPLE)ggsurvplot(fit,conf.int = TRUE)xxxxxxxxxxggsurvplot(fit, data = SAMPLE, risk.table = TRUE,pval = TRUE, conf.int = TRUE,tables.theme = theme_cleantable())
2. PSM
매칭 되기 전과, 매칭 된 후의 데이터 분포 비교를 진행하겠습니다.
cowplot패키지의 plot_grid()를 이용하면 두 개의 ggplot 그래프를 합칠 수가 있습니다.
xxxxxxxxxx# PSM 진행library(MatchIt)Matched <- matchit(EVENT ~ Age +Sex +BTW +Treatment +Survival_Time, data = SAMPLE, ratio = 1, caliper = 0.1)matched.1.mtch <- match.data(Matched)xxxxxxxxxxSAMPLE2 = SAMPLE %>%group_by(Age,Sex) %>%summarise(BTW = mean(BTW))Before = ggplot(SAMPLE2) +geom_bar(data = subset(SAMPLE2,Sex =='Male'),aes(x = round(Age), y = BTW ,fill = Sex), stat = 'identity') +geom_bar(data = subset(SAMPLE2,Sex =='Female'),aes(x = round(Age), y = - BTW , fill = Sex), stat = 'identity') +coord_flip() +theme_minimal() + xlab("Age") +scale_fill_manual(values = c("#FF3333", "#0000FF"))+theme(legend.position = c(0.9,0.1)) +ggtitle("Before Matching")Matched2 = matched.1.mtch %>%group_by(Age,Sex) %>%summarise(BTW = mean(BTW))After = ggplot(Matched2) +geom_bar(data = subset(Matched2,Sex =='Male'),aes(x = round(Age), y = BTW ,fill = Sex), stat = 'identity') +geom_bar(data = subset(Matched2,Sex =='Female'),aes(x = round(Age), y = - BTW , fill = Sex), stat = 'identity') +coord_flip() +theme_minimal() + xlab("Age") +scale_fill_manual(values = c("#FF3333", "#0000FF"))+theme(legend.position = c(0.9,0.1)) +ggtitle("After Matching")library(cowplot)plot_grid(Before,After)
3. Sinkey Chart
특별한 분석이 들어가는 차트는 아니지만, 환자들의 치료 여부에 따라 이벤트 발생 여부 흐름을 시각화 할 수 있는 차트입니다.
xxxxxxxxxxlibrary(ggalluvial)ggplot(SAMPLE,aes(y = BTW,axis1 = Censored, axis2 = Treatment, axis3 = EVENT)) + geom_alluvium(aes(fill = Sex),width = 0, knot.pos = 0, reverse = FALSE) + guides(fill = FALSE) + geom_stratum(width = 1/8, reverse = FALSE) + geom_text(stat = "stratum", label.strata = TRUE, reverse = FALSE) + scale_x_continuous(breaks = 1:3, labels = c("Censored", "Treatment", "Event")) + coord_flip() + theme_classic()
4. Forest Plot
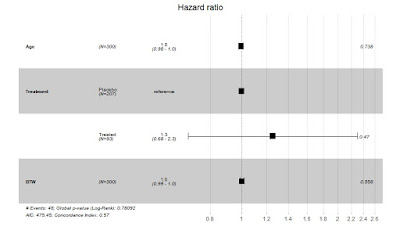
Forest Plot은 Cox Regression혹은 메타분석 결과를 표현하는데 주로 사용합니다. 작성방법은 매우 간단합니다.
xxxxxxxxxxlibrary(survival)model <- coxph( Surv(Survival_Time, EVENT) ~ Age + Treatment + BTW, data = SAMPLE )ggforest(model)5. Network Plot
Network Plot은 각 변수 별 동시 등장빈도, 혹은 상관계수를 이용하여 그릴 수가 있습니다.
데이터 생성
xxxxxxxxxxx1 = rnorm(mean = 0,sd = 5, 150)x2 = rnorm(mean = 0,sd = 5, 150)x3 = rnorm(mean = 0,sd = 5, 150)x4 = rnorm(mean = 0,sd = 5, 150)x5 = rnorm(mean = 0,sd = 5, 150)x6 = rnorm(mean = 0,sd = 5, 150)x7 = rnorm(mean = 0,sd = 5, 150)x8 = rnorm(mean = 0,sd = 5, 150)x9 = rnorm(mean = 0,sd = 5, 150)x10 = rnorm(mean = 0,sd = 5, 150)x11 = rnorm(mean = 0,sd = 5, 150)x12 = rnorm(mean = 0,sd = 5, 150)x13 = rnorm(mean = 0,sd = 5, 150)x14 = rnorm(mean = 0,sd = 5, 150)x15 = rnorm(mean = 0,sd = 5, 150)x16 = rnorm(mean = 0,sd = 5, 150)DataFrame = data.frame(x1 = x1,x2 = x2,x3 = x3,x4 = x4,x5=x5,x6=x6,x7=x7,x8 = x8,x9 = x9, x10 = x10, x11 = x11, x12 = x12, x13 = x13,x14 = x14, x15 = x15, x16 = x16)library(dplyr)library(reshape)Cor_matrix= DataFrame %>%select_if(is.numeric) %>%cor()NETWORK_DF = melt(Cor_matrix)네트워크 데이터 변환
xxxxxxxxxxlibrary(ggraph)network = graph_from_data_frame(NETWORK_DF,directed = FALSE)Basic Network Plot
xxxxxxxxxxplot(network)geom_edge_linke()등의 명령어를 사용하면 더욱화려하게 그릴 수가 있습니다.
xxxxxxxxxxggraph(network) +geom_edge_link(col= 'grey',alpha = 0.4) +geom_node_point(color = "grey", size = 4,alpha = 0.4) +geom_node_text(aes(label = name,col = name), repel = TRUE, size = 8) +theme_graph() +labs(title = "Correlations between variables") +guides(col = FALSE)x
ggraph(network) +geom_edge_link(aes(edge_alpha = abs(value), edge_width = abs(value), color = value)) +guides(edge_alpha = "none", edge_width = "none") +scale_edge_colour_gradientn(limits = c(-1, 1), colors = c("firebrick2", "dodgerblue2")) +geom_node_point(color = "white", size = 5) +geom_node_text(aes(label = name), repel = TRUE) +theme_graph() +labs(title = "Correlations between variables")


댓글
댓글 쓰기